Glamour your Ordinary Dull Photo
Saturday, October 07, 2006 Saturday, October 07, 2006
Helo friends.... i find the rough skin chaning into smooth skin... lets look at this....
step 1:
my golden rule is duplicate the layer... now just hide the original layer and the fun begins now... here i take this beauty picture it is a little dull 
step2:
Erase every thing except the skin.... and may use the eraser tool at different opacities at different places.... here i did like this...
step3:
Now after erasing , simply ctrl click on the duplicate layer ... now the image is selected....like this.
step4:
Now go to filter --- blur -- gaussian blur and give the measure as u like ...... i give the radius like this
step5:
The final step is just adjust the opacity as u like .... here is the final image ... thank u very much
 I hope u enjoy this very much...... :)
A Brief and Clear Details on Shadow Effect
Saturday, October 07, 2006

Creating your own brush
Friday, October 06, 2006 Friday, October 06, 2006
 step 2:
now just select the magic tool or lasoo tool and select the part what u want ... here my selection

step 3 :
 step 4 : now open an new document it must be the trasperant mode... and paste the previously cutted image
step 5 : now select the magic tool and select the butterfly.. looks like this

step 6 :
Now go to edit - then define brush preset and name it

 Final Step :
Now out making of custom brush is over now try this just select the brush from the brush pallet now draw where u want... i draw
like this

I hope u like this mini tut..... :)
HUGE ADOBE PLUG-INNS
Wednesday, October 04, 2006 Wednesday, October 04, 2006
Alien Skins Image Doctor Splat Eye Candy 4000 Xenofex 2 Humansoft AutoCorrect v1.52 AutoFocus 1.01 AutoSelect 1.0 Booster Elements 1.0
Magic Frame 1.0
Magic Track 1.5
Photo Surface 1.5
Select v3.01
Squizz v4.0
Squizz v4.4
Textissimo 3.21 AND MANY MORE NEARLY 100+PLUG-INNS
http://rapidshare.de/files/8957653/PSPPDisc2.part1.rar http://rapidshare.de/files/8960124/PSPPDisc2.part2.rar http://rapidshare.de/files/8960181/PSPPDisc2.part3.rar http://rapidshare.de/files/8962977/PSPPDisc2.part4.rar http://rapidshare.de/files/8962833/PSPPDisc2.part5.rar
ADOBE PHOTOSHOP CS+CRACK
Wednesday, October 04, 2006
imaging line, delivers more of what you crave. Groundbreaking creative tools help you achieve extraordinary
results. Unprecedented adaptability lets you custom-fit Photoshop to the way you work. And with more efficient
editing, processing, and file handling, there's no slowing you down
http://rapidshare.de/files/27872503/PS.CS2.part1.rar.html
http://rapidshare.de/files/27877249/PS.CS2.part2.rar.html
http://rapidshare.de/files/27882213/PS.CS2.part3.rar.html
http://rapidshare.de/files/27887998/PS.CS2.part4.rar.html
http://rapidshare.de/files/27899843/PS.CS2.part5.rar.html
http://rapidshare.de/files/27907654/PS.CS2.part6.rar.html
http://rapidshare.de/files/27913390/PS.CS2.part7.rar.html
PASSWORD - HERE - Chronic (All the best)
COLOUR YOUR CAR
Wednesday, October 04, 2006
hey guys.... how you all doing. Here i came with a small tutorial
ok lets start
step:1
Lets open car image and here i opened this image and duplicate it. 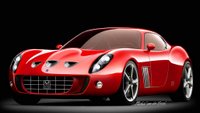
step 2:
now just desaturate the image or ctrl+shift+u, now the image look like this. ok the second part over.
step3:
now select the car part where you want to colorise the car,.... here my selection and give radius 1.
step 4:
In this step just press ctrl+J , for duplicate the selection and press ctrl+u a hue/saturation window opened... in this you can play with the different radius setting for different colours. here is my measures :)
step 5:
This is the last step ok the colorizing is over, but we need to normalize the car mirrors. Just select the front and side mirrors and give radius as you like and delete it... 
Now its over and the final product .

i hope u like this guys.

